There are many people across the nation who has been facing a problem with the fix service host local system high disk or CPU (networking restricted). But there are many who are a victim of this problem but do not know what this thing exactly is. So for those, we will be giving a full discussion on what this actually is and how we can sort out this problem. This problem mainly occurs in the Windows 10 operating system and the symptoms of this problem is it will make your system slow by consuming ninety percent of the space.

So this problem mainly occurs due to guise. Many thinks that it is a system which gives updates in the system but in actual it is a system with a bunch of service run. While this system is on it makes your device CPU full by ninety percent. The process which I will be discussing today are easy to follow and will easily help you to get rid of system high disk consumption. So without doing any further delay let’s start the discussion. Here we have only mentioned the best and the possible ways to sort out the problem.
Solution 1. Disable Superfetch
For starters to begin, we will present the first approach to resolve the issue service hosting local server high disk. You can attempt to disable Superfetch. We will demonstrate how to perform the operation by step by step.
Step 1: Open Services Window.
- Press the Windows keys and then R keys together to open the Run dialog.
- Enter services.msc in the box and select OK to continue.
Step 2: Disable Superfetch.
- In the pop-up window, make sure to scroll down to locate the Superfetch.
- Double-click to continue.
- In the popup window make sure to modify your Startup type to disabled. Change the Service status to stopped.
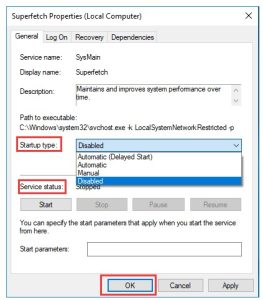
- Click Apply and click OK to confirm the modifications.
After you’ve completed the entire process after which you have completed all steps, you can restart your computer to determine if the issue with service hosts local computer high disk is fixed.
Solution 2. Change Registry Value Data
To resolve the issue of service hosting high CPU If you want to fix the issue, you can try fixing the Registry.
But, be aware that changing your registry is extremely dangerous. It is recommended to backup to Windows 10 to keep computer secure prior to proceeding.
In this article, we will guide you on how to modify registry information to resolve the problem that is causing service hosts local computer high memory.
Step 1. Open the Registry window.
- Press the Windows keys and then the R keys at the same time to launch The Run box.
- Click OK to continue.
Step 2: Change Value data.
- Within the Registry Editor, go through the ControlSet001 folder following the below path: HKEY_LOCAL_MACHINE ControlSet001 > ControlSet001
- Expand the ControlSet001 folder, then locate out Services folder. Select Ndu as the Ndu key.
- In the right-hand screen, choose the Start key, then double-click it.
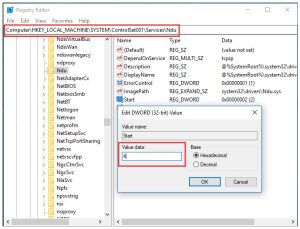
- Next, you need to change the Value to 4 and then click OK to continue.
After you’ve completed all the steps when you are done, you can close this Registry Editor window and reboot your computer to determine if the issue with service hosts local system high CPU Windows 10 is solved.
Solution 3. Run System File Checker
The problem service host local system high disk may be caused by corrupted system files. If you find the issue of service hosting local high CPU, or system high CPU then you can attempt to run System File Checker to check and fix the damaged system files.
Step 1: Open the Command Prompt window.
- Enter Command Prompt in the search box in Windows.
- Choose the most suitable option and then right-click to select Run as an administrator.
Step 2: Type in the commands.
- In the pop-up window, enter the command sfc /scannow and then press Enter for the next step.
- Don’t close the browser until the scanning process has be complete.
- Type the command in and press Enter to continue.
- Once the scanning process is complete When the scanning process is complete, when the scanning process is complete, System File Checker can help you identify the damaged system files and then repair them.
Note In the event that your System File Checker does not work then read the scannow sfc is failing to identify the solution.
Solution 4: Disable Background Intelligent Transfer Service
In this section In this section, we will provide you with the fourth way to fix the problem. service hosts local system high utilization of the disk. You can attempt to disable Background Intelligent Transfer Service. Background Intelligent Transfer Service.
Step 1: Open System Configuration window.
- Press the Windows keys and then the R keys together to launch the Run window. Run
- Input the MSconfig in the box and then click OK to continue.
- Enter msconfig, then click OK to continue.
Step 2: Disable Background Intelligent Transfer Service.
- On the System Configuration window, click on the Services tab.
- Scroll down, and then look for out your Background Intelligent Transfer Service and deactivated it.
- Click Apply and then OK to confirm the modifications.
- remove your Background Intelligent Transfer Service
Once you’ve completed the entire process after which you have completed all steps, after you have completed all steps, can start your PC to determine if the issue with service hosts high CPU is resolved.
Solution 5: Disable Service Host Local System Task
The 5th solution to service hosts local service host local high processor is to turn off your service hosting local service directly. You can stop the process to resolve the issue.
We will guide you through the steps.
Step 1: Open Task Manager.
- Right-click the Taskbar and select Task Manager from the context menu to continue.
- If you prefer, you can use the Ctrl key the Shift key, Ctrl key and Esc key to launch Task Manager.
Step 2: Disable Service Host Local System Task.
- In the popup window you must click the Processes tab to proceed.
- Scroll down to locate out your Service Host Local System. You can also look up the elements are draining you up with your disk, CPU, and memory.
- Once you’ve identified what items are using up your memory, CPU and disk If you know which items are consuming your CPU, disk and Memory, you can select it with a right click and select End Task within the context menu to deactivate it.
Delete the Service Host Local System will continue to run
- After that next, you will receive a message of warning that requires you to verify whether you wish to close the Service Host Local System.
- It is recommended to look for the option to delete any unsalvaged data and close the system. After that, click Shut Down to continue.
Once you have that done after that, you can observe the CPU in The Task Manager and determine if the issue with service hosting local operating system high the CPU Windows 10 is solved.
Conclusion
To conclude, this blog has taught you how to resolve the issue of service hosts local server high disk by providing seven solutions. If you’re experiencing the same problem Try these solutions.
If you’ve got alternatives for this service hosting local computer system high memory problem If you have a solution, you can post it in the comment section.